AR Rifle, AR-15 Basics, AR-15 Parts, AR-15 Triggers
Building an AR-15 Lower Receiver — Components, Tools, and Assembly
Sep
Table of contents
When you’re planning an AR build, it’s tempting to focus on the upper, as that’s where all of the fun stuff seemingly gets attached to. Sometimes building the lower can feel like a bit of an afterthought where you simply picks the parts and go through the motions of assembly. We think this approach is a mistake.
You should never forget that the AR-15 lower receiver you build is the rifle’s foundation, housing the fire control group, buffer assembly, and the user controls. Because the lower is the serialized, legally controlled part, selection and assembly require care and a clear understanding of how each small component affects safety and function. It’s something you want to ensure you get right. This means picking out the parts and features that are best for you, and taking the time to put it together the right way.
To help you with this process, we want to walk you through choosing a receiver, the small parts you will need, recommended tools, and a step-by-step assembly sequence, with explanations so builders can make deliberate choices for home defense, competition, or recreational shooting.
The role of the AR-15 lower receiver
The lower integrates the trigger mechanism, safety selector, bolt catch, takedown and pivot interfaces, and the buffer system. Small parts such as pivots, detents, springs, nuts and screws are essential to reliable operation. Without these small components the rifle will not function correctly, or if it does run it will not do so efficiently. Incorrect parts or improper installation can compromise safety or function, so treat each step as important and verify compatibility between the lower, buffer system and stock before final assembly.
Step 1 — Choosing a lower receiver
Most builders choose a mil-spec forged aluminum lower for a balance of strength and general suitability. Billet receivers, machined from a solid block, are usually selected for specific aesthetics or custom tolerances. When comparing models, consider the rifle’s intended use and whether ambidextrous or enhanced controls are desired. Decide whether threaded or reinforced features will simplify assembly and select a finish for corrosion resistance or personal appearance. Be aware that unfinished or partial lowers that require additional machining may have legal or regulatory implications not covered here.
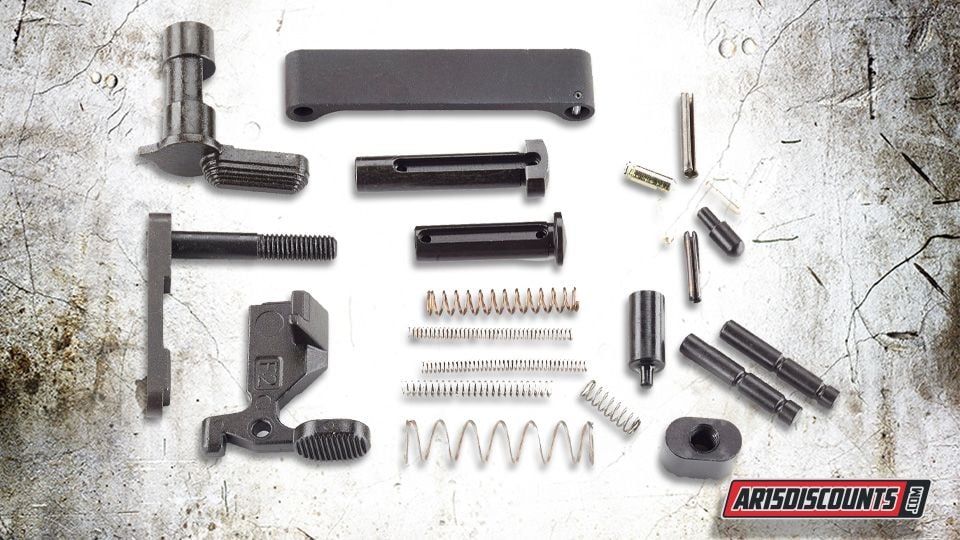
Step 2 — The small parts and why they matter
A complete lower parts kit brings a stripped lower to life. Typical components include the pistol grip screw and washer, the safety detent and spring, the trigger, hammer and disconnector with their springs and pins, the safety selector and its detent, the magazine release button and catch with spring, the bolt catch and roll pin, takedown and pivot pins with detents and springs, the trigger guard and its pin, buffer retainer and spring, end plate and castle nut, assorted roll pins, and various small springs and plungers. Kits vary in exactly which items are included, but most contain roughly two dozen to three dozen small parts.
These parts are not cosmetic. The pistol grip secures the shooter’s hand and houses the safety detent. The fire control group determines trigger feel and safety behavior. Controls and fasteners provide a reliable user interface and allow field-stripping for maintenance. The buffer system absorbs recoil and helps the rifle cycle correctly.
Safety selectors should not be overlooked. A properly functioning safety is essential for smooth and safe operation, and it is wise to check the selector routinely to make sure it is working as intended. Ambidextrous safety selectors function when engaged on either the right or left side of the rifle. They can make applying the safety faster than a standard selector because you can use more of your hand surface rather than relying solely on the thumb. In high stress situations reduced reliance on fine tactile sensation can help ensure the controls are used correctly.
An extended charging handle latch is a simple upgrade that improves the ease of manipulating the charging handle. It provides a larger surface to engage and can be a lower cost way to improve ergonomics without replacing the entire charging handle.
An end plate keeps the rear takedown pin detent and spring where they belong, while also providing a common sling attachment option. It helps protect the rear of the lower receiver from scuffing and marring and serves a small but useful protective and functional role.
Step 3 — Tools you should have
Use proper tools to avoid damaging pins, roll pins or receiver surfaces. A basic tool set for a lower build typically includes a receiver vise block or lower vise block, roll-pin punches and a set of punches appropriate for common roll pins, a bench block or support, a small hammer such as brass or nylon to avoid marring, an armorer’s wrench for receiver extension work, a torque wrench capable of the low ft-lb range used when installing the receiver extension, and a set of gunsmithing screwdrivers for grip screws and small fasteners. Safety glasses and a clean, stable work surface are essential.
Step 4 — Assembly sequence and notes
Work methodically and keep parts organized. The sequence below is commonly used and lets you function-check progressively. These steps assume an unloaded upper or no upper installed, a stripped lower, a suitable lower parts kit, a compatible buffer tube and stock, and the proper tools.
- Install the safety detent and spring in the receiver channel, then fit the pistol grip and secure it with the grip screw. This retains the safety detent and makes the selector easier to align.
- Install the takedown and pivot pins by inserting the detent and spring, compressing with a punch and driving the pin through while keeping the detent compressed. Verify smooth movement.
- Fit the bolt catch, partially drive its roll pin, then finish the pin while supporting the receiver to avoid deformation. Confirm the bolt catch lever engages properly.
- Install the trigger guard and its roll pin to protect the trigger area.
- Fit the magazine release: compress the magazine catch, insert the button, and secure so the release is smooth and magazine retention is positive.
- Install the safety selector. If the grip is already installed this is usually easier to align with the detent.
- Install the fire control group: dry fit the trigger, hammer and disconnector, then insert their pins. Lightly lubricate pivot points and check trigger and hammer engagement. Do not use live ammunition during this check.
- Fit the buffer tube or receiver extension: thread the tube into the lower, install the end plate and castle nut, torque to the manufacturer’s recommended value and secure according to the receiver extension instructions. Install the buffer retainer and spring where applicable. The end plate will also keep the rear takedown pin detent and spring in place and provides a common sling attachment point.
- Insert the buffer and attach the stock, verifying buffer and stock compatibility with the chosen buffer tube and system.
Function check (no ammunition)
With the upper removed or otherwise unloaded, operate the safety selector, depress the magazine release and actuate the bolt catch. Perform an unloaded trigger pull to confirm that the trigger and hammer operate and that the safety blocks firing. If anything does not operate smoothly, disassemble and inspect springs, detents and pin alignment before attempting live-fire.
Final considerations, safety and legal reminders
Verify compatibility across the lower, buffer tube, buffer weight and stock. Some enhanced buffer systems require specific receiver extensions or buffer geometry and are not universally interchangeable. Follow the component manufacturer’s installation and torque recommendations when provided. Prices and availability for parts and tools change over time, so check current sources before buying. Confirm federal, state and local laws before purchasing or building, because rules regarding serialized receivers, transfers and state-specific restrictions differ.